Now that I am harvesting rainwater, there is an app for that. Just kidding. Actually, there is a regulation for that.
As part of the CPC 2013 (California Plumbing Code). There are regulations and limits on rainwater catchment systems effective 1/1/2014.
First, the rainwater system must be isolated from the potable water supply, by either air, or a backflow prevention device. I intend to put a backflow prevention device in when I connect the storage tanks to the underground irrigation system, since the irrigation system is connected to the potable water supply.
Next, there seem to be restrictions on the ability to use the rainwater in a spray irrigation system. The concern here is to prevent pathogens from being released into the air where they might infect someone. There seems to be a workaround if the filtration level is sufficient. Apparently 100 micron filtration will do it. I am going to that level of filtration anyway to insure that I do not clog the spray heads of the irrigation system.
There is also a restriction on the maximum amount of storage in a tank. Apparently 5000 gallons is the maximum storage per tank without a building permit. Since I intend to pump the rainwater harvested back through my irrigation system and I intend to have more than 5000 gallons of storage, but not more than that in any one tank. For a citation on CPC 2013 requirements see this website.
After talking with the county building department I was informed that I must secure a plumbing permit at a nominal cost before I do the job. They have asked that I submit a plan to them for the project. I suppose I will print out many of the illustrations I have already made for this blog as part of the plan. Apparently I am the first person to even ask about this stuff. No one has sought a permit for this use previously.
April 3. Today, I had a building inspector here for the final inspection of my deck. I passed with flying colors. (After all, it was the installation of the deck that started me on this path. I rerouted the downspouts to the valve so that water could be diverted to the storage tanks.) He informed me that I should NOT file for a plumbing permit and that I should just put it in and not worry about it. Now I have an answer that I like. He confirmed that the restriction on 5000 gallons for a permit is per tank, not per system.
last modified 4/5/14

MY WATER CONSERVATION SYSTEMS. I started with the design and implementation of a Rainwater Catchment System for my home. It was then expanded to cover a gray water system, and then started getting into a fog harvesting system. I suggest that you start with the oldest entry first and work your way forward in time. I frequently go back and modify my blog entries to reflect current thinking and to remove errors. If I have modified an entry I have a "last modified" date at the end of the entry.
Monday, March 31, 2014
Friday, March 28, 2014
Secondary Storage of Rainwater
I have designed, but not yet implemented the secondary storage array of IBC totes for the rainwater catchment system. See illustration below

This array or "wall" is for 15 IBC totes. Each tote has a 275 gallon capacity, so this array has a capacity of 4125 gallons. The wall is about 20 ft. long by 12 ft. high and 4 ft. deep. I will connect all tanks at the same level together with a valve to not permit the water to go down to the next lower level in order to keep the water as high as possible in the array for keeping the water pressure high at ground level.
It is my hope to construct two of these walls about 12 ft. apart, running parallel with each other giving me a total capacity of 8,250 gallons for the secondary storage. That way I can construct a roof over both and basically have a breezeway between the two for storage (I can even fit my car in that space). I am going to have to put some sort of cover over the wall to protect the tanks from the UV light.
I will have to modify this design if I use it to allow for air to vent out of the individual tanks as the water rises, just as I have done on the primary tanks. More on this later.
I have also learned of very inexpensive water bladders that will hold 10,000 to 40,0000 gallons of water that might be considerably less expensive, not require protection from the UV light since they are opaque black, and will pressurize as they fill to give me more water pressure without having to pump the water. More on this later.
last revised 6/17/2014
Pumping Water
I have to pump water in a variety of ways. First, I have to pump from the primary storage tanks to the secondary tanks. Additionally, in order to get the required pressure into the irrigation system I have to further boost the pressure of the water coming out of the secondary tanks going into the irrigation system to 30 PSI. In order to accomplish this I have installed pumps into the IBC tote and plumbed the line to the irrigation system. I have illustrated below the way I am arranging the pump.


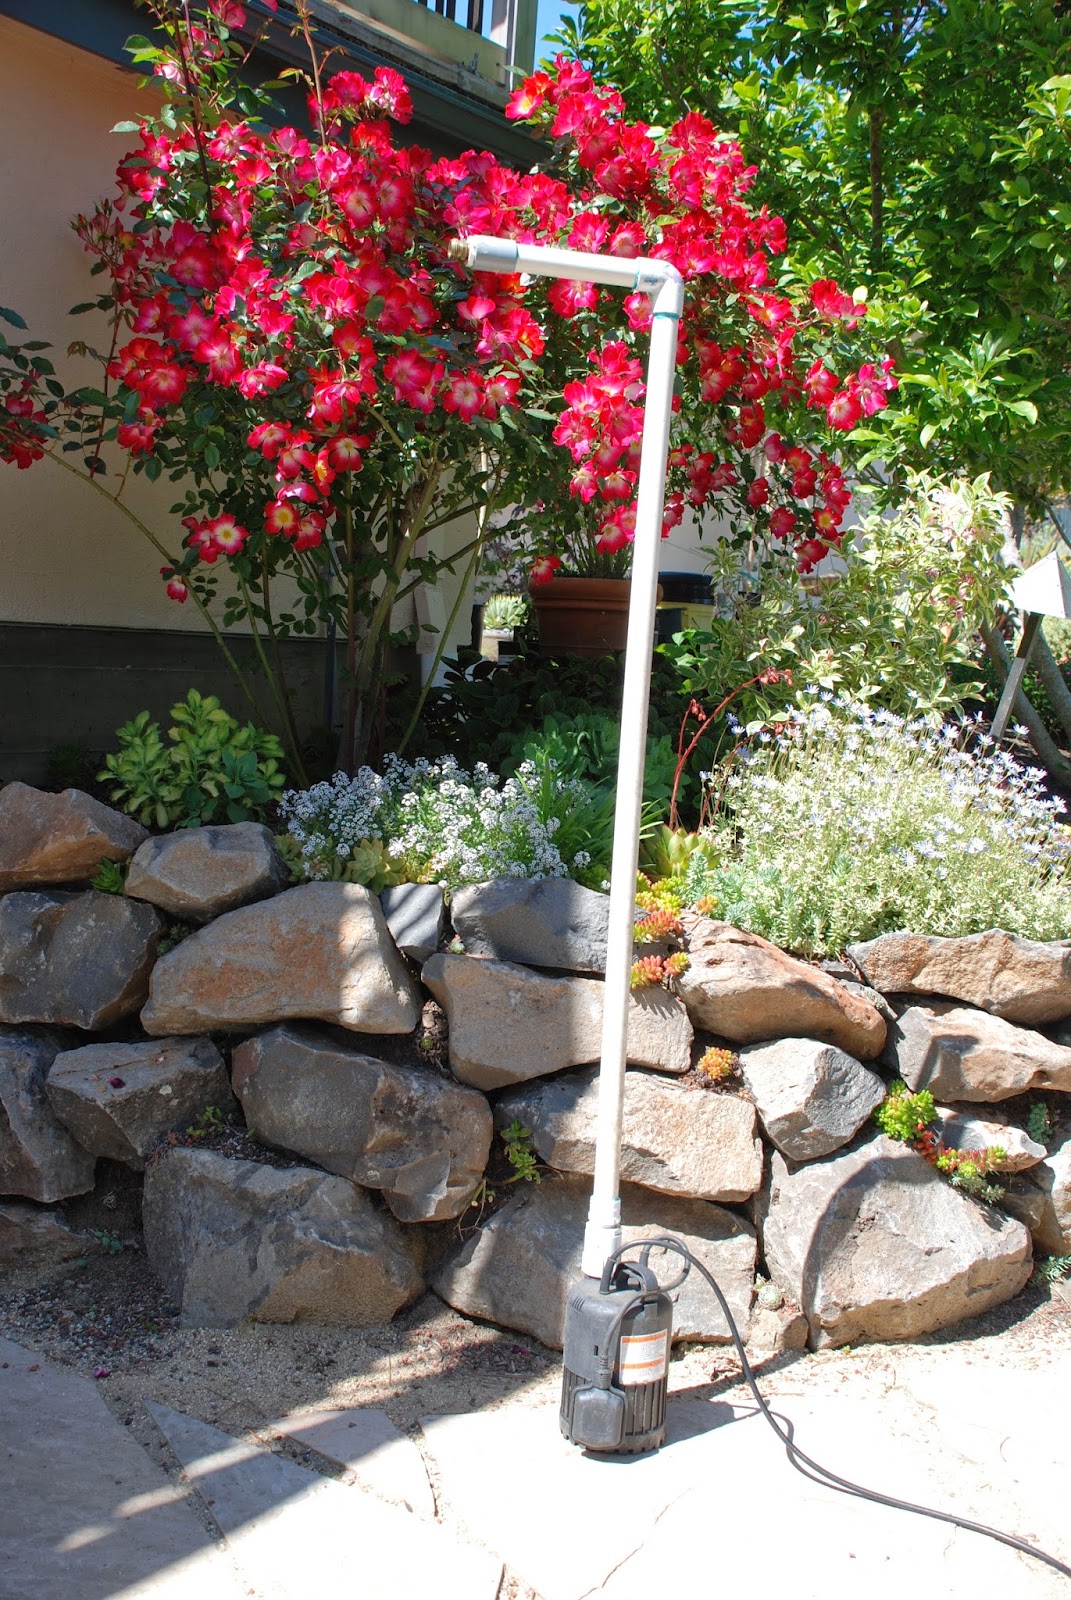 |
| Sump Pump before installation into the IBC Tote |
I have now installed and plumbed in the sump pump to remove water under pressure from the tanks. I have two ball valves in the line so that I can have the irrigation water line feed shut off and use the pump with the faucets in that section of the yard, or I can open the valve to the irrigation line and pump water into my irrigation system. Alternatively, I can run water directly from my irrigation system to my faucets by closing the valve to the tank. See illustration below.
last modified 6/20/2014
Thursday, March 27, 2014
Moving Rainwater to the Secondary Storage Area
I have placed the 4 IBC totes at a location slightly downhill from the house. This way the rainwater can gravity fill the totes. I am going to have to pump the water uphill to secondary storage tanks to get the pressure I need to operate the irrigation system. I need about 30 PSI pressure to operate the sprinklers and valves.
At first I thought I would put PVC tubing between the two areas. They are located about 300 ft. apart. Then, I came up with the idea to pump the water from the totes directly into the irrigation tubing, and then make a second splice into the same irrigation tubing closer to the secondary storage area and use the existing irrigation tubing to transport the water. This will save me tubing and trenching about 175 ft. of the 300 ft. distance. I will have to install either shut off valves at each end or put in a back flow preventer.
last modified 6/21/2014
Filtration of the Rainwater before entry into the IBC Totes
My first attempt at filling the tank resulted in a lot of debris entering the tanks. I have cleaned the tanks and added a filtration system to the line before the water gets to the tanks. It seems to be working just fine.
I constructed the filter out of two 5 gallon plastic container pails, one on top of the other.
The top pail has a very course plastic mesh to filter out leaves and other very large debris. Immediately below that I used a screen mesh (window screen material). I put holes in the bottom of the center of the first pail to allow the water to pass into the second pail. The second pail is constructed with a toilet flange on the bottom to allow drain pipe to be attached to bring the water to the IBC tote, above the flange in the pail I have a stainless steel waste can that has a landscape fabric sock that is fitted inside the stainless steel waste can. The most frequent maintenance is the cleaning out of the first strainer. That strainer got real clogged during the first rain of the season when all the debris on the roof was washed off. After that initial cleaning it has not required much maintenance.


Finally, I have purchased a commercial 100 micron 32" x 7" nylon filter sock to insert into the opening of the IBC tote to catch any impurities that the other two filters did not get. I got this filter from filtersfast.com. It is Pentek NMO100P2S Bag Filter.
As an added protection to the system I have added a small amount of chlorine to the tanks to kill off any nasty organisms that may have been present. I do not have a schedule for doing this on a regular basis. I know that plants do not like the chlorine, so I will keep a close eye on what is going on in the tanks.
March 31, 2014. It is raining again today. I noticed that the filter was clogged. I have discovered that the grit (sand) from the roof that is coming into the system is forming a layer of sediment on top of the screen on the bottom of the upper pail. There were practically no leaves in the upper basket/strainer in this pail. I am now installing a second screen into the upper basket/strainer such that the screen goes up the walls of the basket/strainer. This way, if the sediment covers the bottom of the basket the water can still get out the sides and still be filtered. Hopefully this modification will solve the problem. See improved schematic for the upper pail (below):
last modified 4/14/2014
I constructed the filter out of two 5 gallon plastic container pails, one on top of the other.
The top pail has a very course plastic mesh to filter out leaves and other very large debris. Immediately below that I used a screen mesh (window screen material). I put holes in the bottom of the center of the first pail to allow the water to pass into the second pail. The second pail is constructed with a toilet flange on the bottom to allow drain pipe to be attached to bring the water to the IBC tote, above the flange in the pail I have a stainless steel waste can that has a landscape fabric sock that is fitted inside the stainless steel waste can. The most frequent maintenance is the cleaning out of the first strainer. That strainer got real clogged during the first rain of the season when all the debris on the roof was washed off. After that initial cleaning it has not required much maintenance.
Finally, I have purchased a commercial 100 micron 32" x 7" nylon filter sock to insert into the opening of the IBC tote to catch any impurities that the other two filters did not get. I got this filter from filtersfast.com. It is Pentek NMO100P2S Bag Filter.
As an added protection to the system I have added a small amount of chlorine to the tanks to kill off any nasty organisms that may have been present. I do not have a schedule for doing this on a regular basis. I know that plants do not like the chlorine, so I will keep a close eye on what is going on in the tanks.
March 31, 2014. It is raining again today. I noticed that the filter was clogged. I have discovered that the grit (sand) from the roof that is coming into the system is forming a layer of sediment on top of the screen on the bottom of the upper pail. There were practically no leaves in the upper basket/strainer in this pail. I am now installing a second screen into the upper basket/strainer such that the screen goes up the walls of the basket/strainer. This way, if the sediment covers the bottom of the basket the water can still get out the sides and still be filtered. Hopefully this modification will solve the problem. See improved schematic for the upper pail (below):
 |
| Improved Upper Pail Schematic |
 |
| Photo of two pails before being camouflaged. |
last modified 4/14/2014
Rainwater Storage - IBC Totes

I have stumbled onto IBC Totes (see picture above). These are Intermediate Bulk Containers (IBC) that are used in the commercial trade for the storage and transport of liquid, both food grade and otherwise. I am not an expert on these things, so if I make some mistake about them I will stand corrected if anyone wishes to point it out to me.
These totes are almost cube shaped and look like a commercial storage unit on a palette. They are approximately 4' X 4' X 4' depending upon their capacity. (250, 275, or 330 gallons) The larger capacity totes are taller. They allow for a fork lift to move them around and they have a pallet skid built into their bottoms. They are made of polyethylene and have a galvanized metal skeleton to hold it all together and give the thing strength. They can be stacked on top of each other quite safely, but I think, fully loaded with water, they would be limited to 3 high, with the most elevated tote only about 2/3 full. They have an opening on top that has a 6" screw lid. The lid has a removable 2" plug in its center that can be removed to insert a threaded 2" nipple or pipe.
At the base there is a 2" male threaded opening that is controlled by a ball valve.
These IBC totes are readily available and inexpensive to purchase. I have purchased 4 of the 275 gallon variety and paid $100. each for them. They weigh about 120 lbs. each and can be rolled around easily by one person. I might have difficulty stacking them on top of each other by myself.
I have plumbed the 4 units I purchased together with 2" PVC and appropriate elbows and tees at the output at the bottom of the tanks so that the tanks are all interconnected with each other. So, when I fill or remove water from one unit the water level will raise or lower in all the units. I have also put a faucet on the piping so that I may remove the liquid (see Top View illustration below)
 |
| Top View |
 |
| Front View |
 |
| Photo of my four primary tanks plumbed together with a hose spigot on the end. |
There are a few problems with just putting the tanks together and leaving them out in the sun. Since they are translucent plastic it is my understanding that the plastic will deteriorate from the ultraviolet light and that the water inside would grow algae if it is left in the light. So I am interpreting this to mean that I must build some sort of enclosure to block the light from the tanks.
I have also brought a drain line from the downspouts from my roof through the filter to the top opening of one of the tanks to fill the tanks. I have discovered that I must leave the caps on the tanks loose so that air can enter and escape from each tank for the water to move freely between the tanks. So, I have redesigned this part. I have constructed a manifold (see diagram below) with the 4" drainpipe coming in and using 4" x 2" Tees (one for each of the three tanks, except the one with the pump coming out). Since the tanks are interconnected by the plumbing at the bottom, the remaining tank will fill by leveling with the others. I changed the design to allow for air to escape from the tanks, allowing the water to rise in the tanks easily.

The overflow output is constructed so that it is just slightly higher than the input to the tanks. That way, once the tanks are full the water level in the drain will rise and exit out the overflow line and be directed to a gravel pit I have constructed to catch this water and not erode the soil.
last modified 6/16/2014/2014
History of Water Consumption, Water Production, and ROI Analysis
The table below is an adjusted version of my water consumption for the last five years (units are in CCU Ft. [CCU = hundreds of cubic feet]). I say adjusted because there have been a number of notable events that have occurred which have distorted the "real" usage. We had a malfunction in 2011 when we were in Europe for two months which caused excessive watering, and we had a "blow-out" in our system caused by excessive water pressure in 2010. In both instances the water company has "adjusted" our usage as an accommodation. Yellow highlight in the chart below are readings since I started water conservation efforts
Jan-Feb Mar-Apr May-Jun Jul-Aug Sep-Oct Nov-Dec Total
2014 32 10 78 79 77 13 289
2013 7 31 113 117 95 43 406
2012 9 14 83 116 84 14 320
2011 8 9 84 93 90 33 317
2010 5 6 69 89 89 26 284
2009 8 20 89 82 121 6 326
Avg. 11.5 15.0 86.0 96.0 92.4 22.5 323.7
What is not reflected in the table above is a leak that developed starting in about April, 2013 and lasted until January, 2014.
I have created a further nominally adjusted water usage for the last five years reflecting this additional leak as follows:
Jan-Feb Mar-Apr May-Jun Jul-Aug Sep-Oct Nov-Dec Yearly
2014 8 10 78 79 77 13 265
2013 7 10 83 93 87 22 302
2012 9 14 83 116 84 14 320
2011 8 9 84 93 90 33 317
2010 5 6 69 89 89 26 284
2009 8 20 89 82 121 6 326
Avg. 7.5 11.5 81.0 92.0 91.3 19.0 302.3
This next table is the same as above with projected numbers in red and the tier level in either Blue, Green, Orange, or Yellow corresponding to I, II, III, IV.
Jan-Feb Mar-Apr May-Jun Jul-Aug Sep-Oct Nov-Dec Total
2015 5 6 70 70 70 10 231
2014 8 10 78 79 77 13 265
2013 7 10 83 93 87 22 302
2012 9 14 83 116 84 14 320
2011 8 9 84 93 90 33 317
2010 5 6 69 89 89 26 284
2009 8 20 89 82 121 6 326
Avg. 7.5 11.5 81.0 92.0 91.3 19.0 302.3
2013 2013 2013 2013
Actual RED Total % by volume cost % by cost
Tier I BLUE 116 38.41% $387.44 16.14%
Tier II GREEN 103 34.11 770.44 32.10%
Tier III ORANGE 83 27.48 1,242.51 51.76%
Tier IV YELLOW 0 0.00 0.00 0.00%
Total 302 100.00 2,400.39 100%
Below are the actual 2014 water consumption numbers.
2014 2014 2014 2014
Projected RED Total % by volume cost % by cost
Tier I BLUE 109 41.13% $407.66 20.37%
Tier II GREEN 99 37.36 740.52 37.00%
Tier III ORANGE 57 21.51 853.29 42.63%
Tier IV YELLOW 0 0.00 0.00 0.00%
Total 265 100.00% 2,001.47 100.00%
Below is the actual difference between 2013 and 2014.
Difference 2013 - 2014
Projected RED Total % by volume cost % by cost
Tier I BLUE 7 -2.72% $-20.22 -4.23%
Tier II GREEN 4 -3.25 29.92 -4.90%
Tier III ORANGE 26 5.97 389.22 9.13%
Tier IV YELLOW 0 0.00 0.00 0.00%
Total 35 398.92
I started daily monitoring of the water consumption on February 1, and will keep a current log on-line on a bi-monthly basis starting with the March/April usage.
Note that all tier III water is used during the 6 month period from May to October. Further note that for 2013 while only 27.48% of the volume of water is from Tier III, 51.76% of the cost is attributable to this use. This is a total of 83 CCU of water, approximately 62,000 gallons of water during the 6 month period.
I understand that by reducing the water pressure from 50 lbs. to 30 lbs. will make the sprinklers operate more efficiently and reduce the misting and evaporation of water by at least 25%. This would reduce the water need to about 46,000 gallons.
It is my hope that I will be able to use the stored rainwater that exists in the tanks starting on April 13 of each year to offset this Tier III water use. I think that having the tanks full on that date will not be difficult to achieve.
I estimate that I water the landscape about twice a week, or 18 times per bimonthly period. I will deal with conservation of water use elsewhere. Each cycle is about 3,500 gallons, which comes to about 64,000 gallons. Of these 64,000 gallons 59 CCU or 44,100 gallons are Tier I and Tier II water, leaving about 20,000 gallons of Tier III water to conserve for each bimonthly period. With 10,000 gallons in storage at the beginning the summer season (April 13) and some additional rainwater (computations on precipitation to gallons of storage is below) it is hoped that I can accumulate the additional water needed to eliminate entirely the need for all Tier III water.
I list below monthly averages for high and low temperatures and precipitation.
Month Avg. Avg. Mean Avg. Record Record
High Low Precip. High Low
| Jan | 54°F | 42°F | 48°F | 6.95 in. | 82°F (1962) | 26°F (1949) |
| Feb | 59°F | 44°F | 52°F | 7.32 in. | 80°F (1964) | 26°F (1989) |
| Mar | 63°F | 45°F | 54°F | 4.59 in. | 88°F (1952) | 24°F (1977) |
| Apr | 67°F | 47°F | 57°F | 1.91 in. | 92°F (1996) | 29°F (1976) |
| May | 71°F | 50°F | 61°F | 0.89 in. | 100°F (1976) | 31°F (1976) |
| Jun | 76°F | 53°F | 65°F | 0.14 in. | 110°F (1961) | 40°F (1976) |
| Jul | 80°F | 55°F | 68°F | 0.00 in. | 109°F (1972) | 34°F (1975) |
| Aug | 80°F | 55°F | 68°F | 0.05 in. | 105°F (1998) | 41°F (1996) |
| Sep | 79°F | 54°F | 67°F | 0.21 in. | 109°F (1958) | 40°F (1985) |
| Oct | 73°F | 51°F | 62°F | 1.49 in. | 106°F (1980) | 34°F (1974) |
| Nov | 62°F | 46°F | 54°F | 4.31 in. | 88°F (1980) | 30°F (1974) |
| Dec | 54°F | 42°F | 48°F | 7.59 in. | 79°F (1967) | 20°F (1990) |
Total total annual Rainfall 35.35 in.
I am now tracking actual precipitation by week for 2014.
Jan 1 0.0
Jan 8 0.0
Jan 15 0.0
Jan 22 0.0
Jan 29 0.0
Feb 5 0.7
Feb 12 0.38
Feb 19 0.0
Feb 26 0.84
Mar 5 0.14
Mar 12 0.0
Mar 19 0.05
Mar 26 0.44
Apr 2
My measurement of precipitation to gallons of water harvested is estimated to be approximately 1,000 gallons for each inch of rain. Right now I am only harvesting the rain from about half my roof. Since my house footprint is 3,200 sq. ft. I estimate that 1,600 sq. ft. of footprint (half) is yielding the 1,000 gallons of water. To cross check this number, each foot of roof footprint is generating 7.48/12 = .623 gallons of water for each inch of rain, and .623 gallons x 1,600 sq. ft. = 1,000 gallons of water generated for an inch of rain.
The table below recapitulates the rainfall for the 6 summer months categorized into bimonthly pairs corresponding to the bimonthly billing periods.
Computation of Rainwater Collected Per Inch of Water for Summer Months
Period Estimated Potential Potential
Precipitation Rain Harvest Rain Harvest
(in inches) Half Roof Full Roof
(in gallons) (in gallons)
May - Jun 1.78 1,780 3,560
Jul - Aug .16 160 320
Sep - Oct .99 990 1,980
Totals 2.93 2,930 5,860
Even if I could capture every gallon of water generated during this period of time for the entire roof, with a storage capacity of 10,000 gallons I would only be capturing 10,000 gallons prior to April 12, and 5,860 gallons after April 13, for a total of 15,860 gallons. The Tier III demand is 20,000 gallons per bimonthly period for three periods, or 46,000 gallons. So, we have a deficit of 30,140 gallons. The only way to improve this situation is to increase the storage capacity so that by April 13, there is more water stored, or to reduce the demand by further conservation techniques.
On the bright side, the reduction to 30,140 gallons of Tier III water will save approximately $603.40 on the water bill, but only $317.48 is attributable to the water storage and the remainder to the pressure reduction.
The cost of 1,100 gallons of water storage is approximately $300, or $0.27 per gallon. 10,000 gallons will cost approximately $2,700. So, the anticipated return on investment (ROI) on $2,700 will be $317.48 per year less $130 for depreciation and maintenance, or $187.28 net, and a 6.9% (ROI) on an average year. I can only assume that the cost of water will continue to rise, while the cost for the storage system will be a sunk cost.
The ROI on the pressure reduction regulator is much higher, probably paying for itself in less than one year. I found one for under $100, but have not installed it yet.
last modified 10/16/2014
Getting Started -- Existing Conditions and Objectives
I will outline here what my objectives are. As I progress with my system I will post the progress. I encourage any and all with questions or ideas on how to improve my system or how their system is progressing to let me know.
This Blog will be dealing with water conservation and the construction of a Rainwater Catchment System to augment the municipal water supply that is used at my residence. I am primarily interested in getting irrigation to the plants in my yard. I may try to generate potable water at some later date. We are anticipating a drought out here in Northern California this year and the municipal water district is discussing the imposition of mandatory water rationing.
I have already started building my system. I should have started with the blog before I did anything, but who knew it was going to get so interesting.
By way of introduction, the lot is about 48,000 sq. ft. in size. The house has a footprint of about 3,200 sq. ft. The asphalt driveway is about 2,000 sq. ft. There are about 11,000 sq. ft of irrigated landscape, with about 1,000 sq. ft. of that being a lawn. About 5,000 sq. ft. of the unirrigated portion of the lot is landscaped with low water or no water landscaping. There are a number of very large pine trees on the lot in the unirrigated portion.
I have a slot drain at the bottom of the driveway from which I can capture any water that flows down most of the driveway. I have gutters and downspouts on the house that were draining into a drainpipe going to the street. I have placed a valve in that drainpipe and have now diverted about half the water coming off the roof to another drainpipe that will go to the rainwater storage system.
I have found some YouTube videos that might be helpful:
https://www.youtube.com/watch?v=k3Rubm0tU4U
last modified 8/16/2014
Subscribe to:
Posts (Atom)